Wednesday, April 20, 2011

Baby Projects 1

I've made a couple more things for babies lately that I wanted to share.

1. Rag Quilt for Timothy James Hunter--my sister's boy due beginning of June:


2. Tux Onesie for my little guy. I've been wanting to make this for over a year, but didn't have a reason to. Now that I'm having a boy, I do! I just need some black pants now, and we'll be all set.


I don't have a baby to model it on yet, so here's the alternative... :)

Sunday, February 27, 2011

Turning an IDEA into a REALITY

At the OB clinic I go to there are tons of little quilts hanging on the walls (like murals) that the doctors made. That's pretty much all the decor they have, and it's really neat! There are so many different patterns and pictures they came up with, and I thought it was a great idea.

So, I was really bored at work one day (surprise, surprise) and started doodling. I drew a graph, then started coloring in the squares to make a picture. I started thinking about the quilts at the OB clinic, and decided I wanted to make one to hang in the nursery (when we get one). This is what I came up with first:


Looking at the hearts, it seemed really girly, and I decided I wanted something more neutral that would work in the nursery for all of my future kids no matter their gender. I came up with a tree which turned into an Apple tree because the apples would add more color. This is what it looks like:


I REALLY liked this one, but didn't really know how to go about making the idea a reality. I decided the first thing I would need, of course, is FABRIC. I took my MiL to Joanne's with me and she helped me find a lot of different colors with different patterns on each.

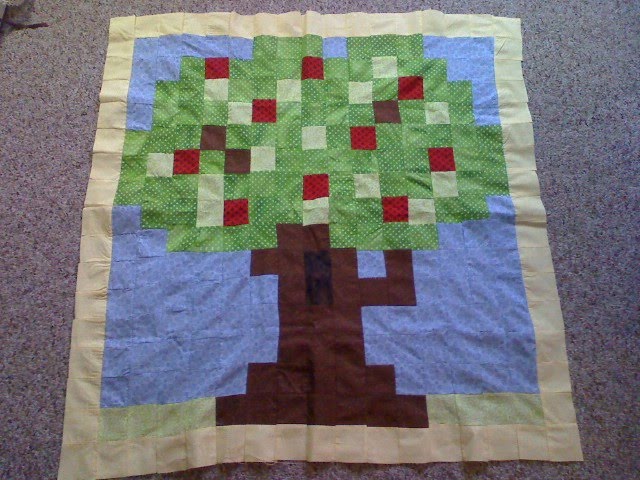
I cut the squares about 3"x3" so they would be about 2"x2" by the time they were all sewn together. (Looking back now I'm not sure why I wanted to do it so small. The blanket topper is a little smaller than I thought it would be, but that's not a big deal.) I LOVE IT! It's definitely not perfect, and a LOT of seems don't even line up, but I guess that's the beauty of doing a tree--it's VERY forgiving! Anyway, here's the finished product (well, the finished TOP anyway):


Here's a closer look at the different patterns in the fabric:


I still need to get fabric for the back and I think I'll do a ribbon-type edge. Not sure what color yet, but Shaun will help me figure that out. I think the different colors and patterns will help stimulate the baby's brain as he/she looks at the quilt on the wall as we rock him/her.

Final Product w/ backing:

Rag Quilt mini class

My RS had a little mini class for those who wanted to learn how to make a rag quilt. I, of course, jumped at the opportunity. I love crafting, and always need social time with other women, so this class was PERFECT! There were only about 10 women who showed up, and we were all spread out across teh gym at the church--2 per table so we all had plently of working space.

Here's what mine looks like right now. I did all the cutting and sewing in about 2 hours. (I knew if I didn't get it done that night at church it wouldn't get done.) Shuan came to Joanne's and picked the fabric out with me for our baby-to-be. We tried to get more gender neutral stuff since we don't know what gender the baby is yet, but the more I worked on the blanket the more it looked like a boy blanket to me. Oh well.


Here's a close up of the fabric:


It's not done yet, obviously, but it's close. To complete it all I would need to do is sew around the edges and cut the lines so they will frey when washed, and it'd be done. I came home and showed Shaun, and we decided it would look better with a border, so I'm going to add that before sewing up the edges. I just need to get more fabric.

I told Shaun I was thinking about sending this blanket to Hailee (my sister) since she's having a boy, but he wants to keep it for our kid because he likes it, and we picked the fabric out together. Sorry Hailee--I'll make you a different one! =)

I'll make sure to post a picture of the finished product if it ever gets done. haha

For instructions on how to make these quilts, click here.

Something just seemed to be missing after the above photos, so I added a border. Finished product (still needs to be washed to get the full frayed affect):